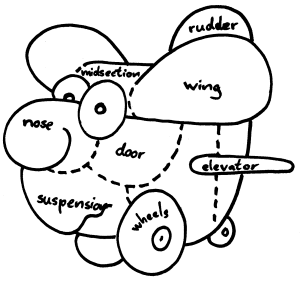
We would like to give you some hints, if you are building a new Lazy Bee.
So just take a look at the drawing and click on to the labeled areas:
 |
Because we are not only flying on calm days from paved, wide runways, we used spars from spruce for the wing midsection. But it showed, that when flying under rough conditions, the spars in the wingtips, which we made from balsa, are damadged easily, when touching the ground while landing. We therefore advise you, to use only spruce spars in the whole wing. The wingtip laminations are very stiff, balsa works just fine here. |
Using spars from spruce makes the midsection of the wing very stiff. But the rubber band, holding the wing on the fuselage, or better, the fuselage to the wing while flying, damadged the leading and trailing edge. The best way to prevent this, is to integrate a piece of spruce into the balsa, where the rubber band runs along. |
 |
 |
When we covered our Bees, we discovered, that the wingribs were very soft and started bending, when the coverage was shrinking. Because there are no spars in the aft part of the wingprofile, they also can not withstand a lot, when the Bee crashes. This is why we recommend capstrips not just on the outer ribs, but on the aft part of all of them. The additional weight can be reduced by cutting holes into the Ribs. |
Because all the forces acting on the tailwheel also act on the hinges of the rudder, you better use strong ones here. They may weigh more, but small hinges are quickly destroyed, when making a "sliding touchdown". |
 |
 |
The "removable tailfeather"-stabilizer is a great sollution for a small plane! We installed it, because it's span is so big. Afterwards it showed, that the risk of breaking something is then much smaller, because the stabilizer can move if unnormal force are acting on it while touching down. |
Flying under rough conditions, we realized that the thickness of the stabilizer is a little bit to thin and vulnerable. In fact, Tims stabilizer is broken in the middle. Only the coverage is holding it in shape. If we would build a new Bee, it sure would be five milimeters thick and built like the rudderpart with tiplaminations. |
 |
 |
We really like the look of the Bee, but unfortunately the construction of the motormount for the electric Bee did not please us. We therefore changed the construction a bit and added a nosecowling. A little technical drawing can be downloaded. |
When you are building an electric Bee, the best way to change your batteries is a little door in the side of the fuselage. A drawing of our construction can be downloaded. To prevent the fuselage from being damaged, while changing the batteries, we used one spruce and one balsastrip for the laminations at the front and at end of the fuselage opening. |
 |
 |
The look of the Bee is great, especially because of the Trexler wheels. Unfortunately they are to expensive for us poor students :o), but we found good substitutes. Now we think, that flying from water should be even greater, but Tim, as a student of naval architecture, did not like the looks of the original floats. That is why we started to build a mould, to laminate them from fiberglass. A 3D-view of the Bee with the new floats can be downloaded. First testflights are expected soon. We will inform you! |
The axlebox with the suspension is a really great idea. However, normal rubber bands used to break after a few landings, because they got stuck between the box and the axle. We now took a rubber band, that can be bought at the sailing shop. It consists of many thin rubber bands, surrounded by a nylon fabric. It is not worn out so fast, and you adjust the suspension very smooth. |
 |